Monday, April 14, 2014

Art Journal "How To"

What is an "Art Journal"? And what is "Art Journaling"? Many people have asked me these questions and there are many answers all over the web, but I thought I would write a post about what an Art Journal is and what Art Journaling means to me.
An Art Journal is any type of bound book, be it sketchbook, old catalogue or a hand bound booklet of artist paper, where an artist or creator can be free to experiment with different mediums and techniques without risk of ruining a canvas or taking up much space at all. Art Journaling is quite a meditative process and I often find myself losing all track of time and space over a page. Any level of artist or person who just wants to create can make an Art Journal. It can even be used like a regular journal, to record thoughts and experiences. It doesn't even have to be shown to anyone. Many Art Journals tend to fall in the realm of scrapbook and take on a cutesy appearance. I prefer to use a more edgy, rock 'n roll approach without many die-cuts, gift tags or other scrapbook-type embellishments. So... without further ado, here is a step-by-step guide to creating an Art Journal page, my way:

1. Start with a piece of paper (usually already bound in a designated Art Journal or sketchbook).
    -watercolor paper
    -copy paper
    -card stock
    -manila folder

**Here I used a cut up piece of a manila folder. 

2. Prime the paper using:
    -gesso
    -acrylic paint
 
**Here I chose to use Liquitex gesso, a thinner type of gesso. Gesso is a paint mixture consisting of a binder mixed with chalk, gypsum or pigment. It gives other paints something to adhere to and thickens the page. 

3. Find a theme. You can use a favorite quote or one from the web or a magazine. You can also use personal journaling as your theme ie. something you have done or been thinking about lately. 

4. Texturize with at least three of the following:
    -collage with cutouts from magazines/books
    -watercolor paint
    -acrylic paint
    -spray ink
    -stamps 
    -stencils
**Here I started with Tim Holtz Distress Ink, "Rusty Hinge" color. This is very concentrated ink used to re-ink stamp pads (I think), but I use it like any other liquid ink or dye. Here I dripped a bunch of drops onto the paper, tilted the paper up, down, back and forth to let the drops run down the page. Finally, I blotted the ink with a paper towel letting it smudge all the while. 

**Here I looked through a NYLON magazine for a few images to collage, as well as a theme for my page. I found the words "ROYAL ART" and thought that sounded interesting, and decided I needed some "royalty" to go with it. These lady's necklaces and hair made me think of Cleopatra, so I chose them as my queens. I also experimented a bit with placement to see where I would need more texture. 

**Here I was trying to decide on a stencil to use with some peach colored acrylic paint I mixed up. The first I decided against. The second I used, along with a brayer (that rolley thing with the dark red handle) which made those horizontal lines in a few random places on the page. 

**After using Mod Podge to secure the queens and the title, I decided they needed a crown connecting them. So I used Aleen's Tacky Glue to "draw" the outline of a shared crown then sprinkled the wet glue with glitter (just like we all used to in elementary school). I also drew some tiny gems on a piece of red cardstock, cut them out and glued them on the crown too. 

**Here I used a fine tip Sharpie Paint Pen to outline the queens. I guess I did this just to make them my own. By this point in a page, I just feel like I should do something, so I do it. 

**Here I used a tiny piece of black oil pastel to draw around the edge of the page for a border. Then I rubbed it with my finger to give it a distressed, smudged look. 

5. Text
    -cutout from magazines/books
    -stamped
    -handwritten
    -date/quote/thought/journaling

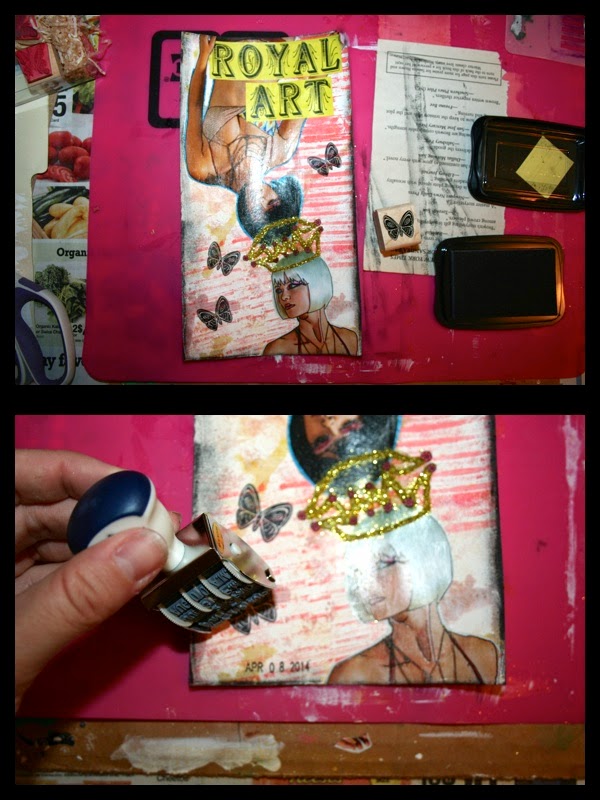
**Here I already had the "ROYAL ART" text down, but I added a date stamp as well as a few butterfly stamps with black StazOn ink just to give it the finishing touches the page needed. 

**Here is the completed page! One is with a flash and the other without. 


So, there you go! There it is. Art Journaling. What it is. What it means to me. And how to do it yourself, my way. I challenge you to try it, you'll fall in love. I know I have!

For more information on Art Journaling, here are some of my favorite Art Journalers:
    -Aaron AKA ImperfectImpulses https://www.youtube.com/user/ImperfectImpulses
    -Teesha Moore http://www.teeshamoore.com/
    -Tamara Leporte AKA Willowing https://www.youtube.com/user/willowing


Tuesday, February 4, 2014

Make your own stencils!

A couple months ago I bought a few plastic school folders to turn into my very own stencils. I used an Exacto knife and ruler to create a few different patterns. I now have circles, diamonds, a burst effect, a tessellation and chain link. I got the idea for the chain link from a youtube video of one of my favorite art journalers, ImperfectImpulses http://www.youtube.com/watch?v=40X0x21Ww9Q
I have used the circles, diamonds and burst effect so far on art journal pages. Go see if you can spot them. I can either sponge paint through the holes in the stencils or use them more like a big stamp. They are great for adding texture and cost me 25 cents. Perfect!


Wednesday, November 6, 2013

The Wonderful World of Zentangle

I stumbled upon the Zentangle method while searching the web for art journal ideas a few months ago. I was instantly hooked. I read all about zentangle on the official website www.zentangle.com, bought a book at Barnes And Noble and scoured blogs to learn more. I found Linda's List of official and unofficial zentangle patterns and began copying them into my sketchbook. I ordered a couple 20-sided dice on amazon for choosing random patterns. I then decided to fill my most recent sketchbook for The Sketchbook Project with zentangle art!
I am now finished copying over 400 patterns, almost finished with my Sketchbook Project entry and today, started making zentangle coasters!
I can't wait until I can become a certified Zentangle teacher!

Monday, September 2, 2013

More Art Journal

I've really been going strong at this art journal thing lately. It's just so addictive. So many inks and stamps and stencils and pens and paints and papers to collect and assemble. I've used a few tutorials on youtube and my favorite channels are:
imperfectimpules (https://www.youtube.com/channel/UCjU04ybwhaF0OyvQp-4Y1Eg) and
jennibellie (https://www.youtube.com/channel/UCLcCpPlstxRVN-Bi7cll8MA)
Unlike other art journalers I've found so far, I don't like using cheesy quotes on my pages and I like making things look a little more hip and a little less cutesy/scrapbook-y. I don't know, you can tell me what you think. Here are my latest pages:


Friday, August 2, 2013

Back To My Art Journal

Three years ago, during my "res" year (year of living and working in Washington to gain residency status for school), I needed an artistic outlet. I didn't have enough money to buy tons of canvases or even paper to put art on. I was also running out of space to store large pieces. I came across art journaling online while researching book binding techniques and I dove in head first. Art journals come in many forms such as scrapbooks, sketchbooks, diaries. My art journal would come to be a place to paint, stamp, doodle, collage, practice and share day to day thoughts and goings-on. I made my own art journal out of a composition book for the cover and filled it with pages made from old manila folders. I went about creating a page each day and did this until I started school and got way too busy in the fall of 2010.
Recently, I found my art journal again. I set up an art table. I went a little crazy on new supplies from Dick Blick and Michaels. And I've been artsy fartsy crazy! Here's what I've created:


Sunday, July 28, 2013

The Maxwell Cabin

Last weekend my sister Rachel, her son Emmitt, her boyfriend Appi, Nic and I went up to The Maxwell Cabin in the Uintah Mountains of Utah along the Mirror Lake Highway. We had a relaxing, fun time fishing, cooking, playing games and visiting. The day we left, I sat outside and drew the cabin from the driveway. I used a Faber-Castell Pitt marker and a quick, sloppy sketch technique.

Wednesday, July 3, 2013

Sunday Funday Arts & Crafts

Since moving into our new house mid-May, the roommates and I have been hosting Sunday Funday complete with beer-brewing, beer-drinking, appetizers, smoked meats, fun and games. A couple weeks ago I decided to add Arts & Crafts into the mix. I pulled together my extra 1'x1' masonite boards, VICE magazines, paints, scissors and mod-podge for ultra-hip collage making. Chris, Dru, Athena, Jackson and I jumped right in and got creative.


A few of us went for more "adult themes" and the others went the more abstract/PG route. It felt great to have my friends around me doing something fun, new and extremely entertaining. We all liked this new Arts & Crafts time so much we plan on doing it again soon. Next up: Paper Making with my Papa's homemade paper maker. 
(below: my collage, below that: Athena and her collage)