An Art Journal is any type of bound book, be it sketchbook, old catalogue or a hand bound booklet of artist paper, where an artist or creator can be free to experiment with different mediums and techniques without risk of ruining a canvas or taking up much space at all. Art Journaling is quite a meditative process and I often find myself losing all track of time and space over a page. Any level of artist or person who just wants to create can make an Art Journal. It can even be used like a regular journal, to record thoughts and experiences. It doesn't even have to be shown to anyone. Many Art Journals tend to fall in the realm of scrapbook and take on a cutesy appearance. I prefer to use a more edgy, rock 'n roll approach without many die-cuts, gift tags or other scrapbook-type embellishments. So... without further ado, here is a step-by-step guide to creating an Art Journal page, my way:
1. Start with a piece of paper (usually already bound in a designated Art Journal or sketchbook).
-watercolor paper
-copy paper
-card stock
-manila folder

2. Prime the paper using:
-gesso
-acrylic paint

**Here I chose to use Liquitex gesso, a thinner type of gesso. Gesso is a paint mixture consisting of a binder mixed with chalk, gypsum or pigment. It gives other paints something to adhere to and thickens the page.
3. Find a theme. You can use a favorite quote or one from the web or a magazine. You can also use personal journaling as your theme ie. something you have done or been thinking about lately.
4. Texturize with at least three of the following:
-collage with cutouts from magazines/books
-watercolor paint
-acrylic paint
-spray ink
-stamps
-stencils

**Here I started with Tim Holtz Distress Ink, "Rusty Hinge" color. This is very concentrated ink used to re-ink stamp pads (I think), but I use it like any other liquid ink or dye. Here I dripped a bunch of drops onto the paper, tilted the paper up, down, back and forth to let the drops run down the page. Finally, I blotted the ink with a paper towel letting it smudge all the while.

**Here I looked through a NYLON magazine for a few images to collage, as well as a theme for my page. I found the words "ROYAL ART" and thought that sounded interesting, and decided I needed some "royalty" to go with it. These lady's necklaces and hair made me think of Cleopatra, so I chose them as my queens. I also experimented a bit with placement to see where I would need more texture.

**Here I was trying to decide on a stencil to use with some peach colored acrylic paint I mixed up. The first I decided against. The second I used, along with a brayer (that rolley thing with the dark red handle) which made those horizontal lines in a few random places on the page.

**After using Mod Podge to secure the queens and the title, I decided they needed a crown connecting them. So I used Aleen's Tacky Glue to "draw" the outline of a shared crown then sprinkled the wet glue with glitter (just like we all used to in elementary school). I also drew some tiny gems on a piece of red cardstock, cut them out and glued them on the crown too.

**Here I used a fine tip Sharpie Paint Pen to outline the queens. I guess I did this just to make them my own. By this point in a page, I just feel like I should do something, so I do it.

**Here I used a tiny piece of black oil pastel to draw around the edge of the page for a border. Then I rubbed it with my finger to give it a distressed, smudged look.
5. Text.
-cutout from magazines/books
-stamped
-handwritten
-date/quote/thought/journaling
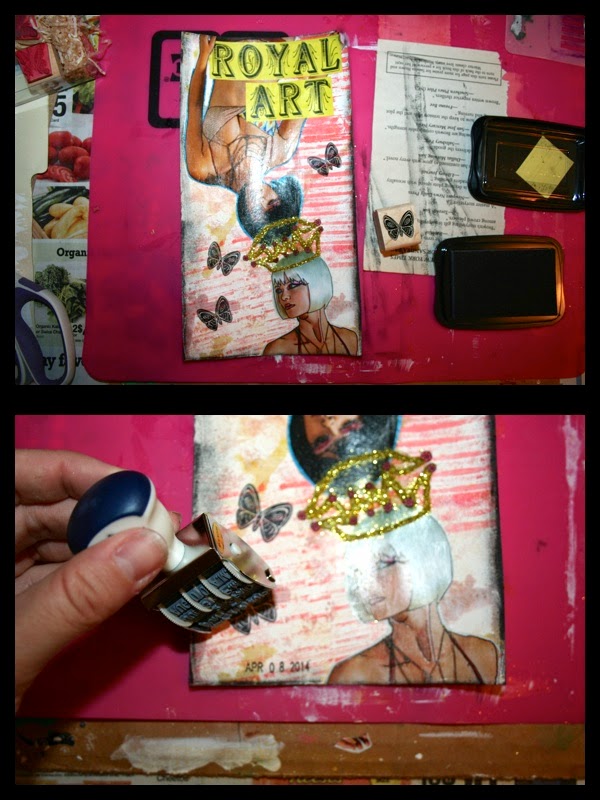
**Here I already had the "ROYAL ART" text down, but I added a date stamp as well as a few butterfly stamps with black StazOn ink just to give it the finishing touches the page needed.

**Here is the completed page! One is with a flash and the other without.
So, there you go! There it is. Art Journaling. What it is. What it means to me. And how to do it yourself, my way. I challenge you to try it, you'll fall in love. I know I have!
For more information on Art Journaling, here are some of my favorite Art Journalers:
-Aaron AKA ImperfectImpulses https://www.youtube.com/user/ImperfectImpulses
-Donna Downey https://www.youtube.com/user/donnadowney
-Teesha Moore http://www.teeshamoore.com/
-Tamara Leporte AKA Willowing https://www.youtube.com/user/willowing
I am going to be starting something similar... but more of just a journal with sketches... watercolors... stories and polaroids :) so I guess like a scrapbook but cooler than those ones mom's do haha
ReplyDelete